 Web pages can form an excellent basis for putting
together a multimedia presentation. I find them more versatile and
easier to work with than many of the professional programs sold to do
this job.
Web pages can form an excellent basis for putting
together a multimedia presentation. I find them more versatile and
easier to work with than many of the professional programs sold to do
this job.
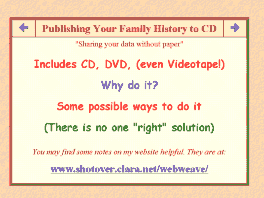
Two areas where I use this technique regularly, are producing sets of lecture slides and producing CDROMS on behalf of the Oxfordshire Family History Society. The image to the right is an example of the first of these. In use it would of course, be a full screen image.
I describe the latter application elsewhere on this web site, on the pages devoted to publishing Monumental Inscription Transcripts on CDROM.
A third use of the technique is to "publish" my family history research on CDROM for the benefit of other family members and friends. A recent talk to the Oxfordshire Family History Society on this subject (yes, that is the first slide for the talk) prompted me to add these notes to the Shotover web site.
The simplest approach is just to tell your viewer on the opening page, to press the F11 key. More elegantly, your starting page can automatically open a full screen window for the main presentation, by use of the following simple javascript:
    <HTML>

    <HEAD>
	<TITLE> Starting Page </TITLE>
    </HEAD>


    <BODY background="paper.jpg">


    <H1> My Wonderful Presentation </H1>


    <A href="javascript:void(0);" onClick="window.open('firstpage.htm','',

    'fullscreen=yes, scrollbars=no, resize=no, location=no, menubar=no');">

    Click here to start the show
    </A>

    </BODY>

    </HTML>
Unfortunately there is one small snag with both the above methods. They work fine with most browsers and with Internet Explorer up to version 5.0. However a "feature" crept into IE5.5 and remains in IE6, whereby an empty right-hand scroll bar appears on screen, even when it is not required. This can be worked around, by making the starting page launch a frameset page, which in turn defines a single frame for the presentation proper. On a framed page, Internet Explorer is still prepared to respect your scrollbars=no instruction. Thus your firstpage.htm opened in full screen mode by the javascript above, is now a frameset page, which in turn launches the first page of your presentation proper.
    <HTML>

    <HEAD> <TITLE> Frameset Page </TITLE> </HEAD>

    <FRAMESET cols="*" frameborder="0" frameborder="no" border="0" framespacing="0">

    <FRAME src="page1.htm">
</FRAMESET>

    </HTML>
If you have automatically created a full screen browser using the method just described, your user will not be able to return to a normal browser window by pressing F11. Your pages should have all the necessary links to allow the user to navigate your chosen path or paths through the presentation. However you also need to tell the user how to close the window at the end. The simplest way is to display the message "Press Alt-F4 to Exit on the last page. It can be also useful to know that Alt-LeftArrow and Alt-RightArrow act as the browser's Back and Forward buttons in Kiosk mode.
If you have a full screen image, in a full screen browser window, you have no browser command buttons and nowhere on the screen to put a conventional text link. So you need to provide your user with a way to move on to the next page. At its simplest, this can be done using the whole image as a link, as described in the Adding Pictures page earlier in these notes. A more flexible approach is to define an Image Map for the picture, specifying a series of "Hot Spots" which when clicked, take the user to one of several different pages. The example below defines just two hot spots in the form of rectangles covering the left and right halves of the image respectively.
    <HTML>

    <HEAD>

    <TITLE>Example Full Page Image</TITLE>

    <STYLE TYPE="text/css"> BODY {margin: 0;} </STYLE>

    </HEAD>

    <BODY bgcolor=black>

    <MAP name="example">

    <AREA shape="rect" coords="0,0,399,595" href="prev.htm">

    <AREA shape="rect" coords="400,0,799,595" href="next.htm">

    </MAP>

    <IMG usemap="#example" border="0" src="picture.jpg" height=596 width=800>

    </BODY>

    </HTML>
<EMBED src="test.wav" hidden=true autostart=true loop=true>
Here "test.wav" is your sound file in standard Windows .wav format. You can use the standard Windows Sound Recorder Accessory to record the sound and save it in the format of your choosing. I find Microsoft ADPCM, 8kHz, 4 bit, mono is adequate for most purposes. This is one of the standard options suported by Windows media player without the need for any plug-ins, and keeps the size of the .wav file fairly small.
If the hidden parameter is set to true as here, there will be no visible element on the web page, the sound will just play, assuming the autostart parameter is also set to true. With loop set to true the sound will repeat indefinitely. (In this case you might wish to warn the viewer that the sound can be stopped by the browser's "Stop" button, or by pressing the "Esc" key.)
By setting hidden to false, Windows Media Player appears on the page, giving the user scope for starting and stopping the sound, and adjusting the volume. In this case width and height parameters can also be added to limit the size of the Media Player display. Rather sensibly this acts by cropping the image, so it can be reduced to just the essential controls by the following parameters:
<EMBED src="test.wav" hidden=false width=300 height=25 autostart=true loop=false>
I have tested this version of the tag on the following browsers and it works with the limitations indicated. It is reasonable to expect it will also work on later versions of the same browsers.
<IMG DYNSRC="test.avi" start="openfile" loop="infinite">
As shown here the video clip will loop indefinitely. To play the clip just once when the page has loaded the parameter loop="no" can be used.
This works provided the test.avi file contains video (and sound) in a format that Windows and the browser can understand. There is a demonstration .avi file called wndsurf1.avi that is included with Windows and this works fine. Unfortunately the .avi file format only specifies that the file contains audio-visual information without defining how the video is encoded. There are many different variants of .avi in use, each requiring its own specific codec (the coder-decoder combination used to compress and decompress data).For example many modern digital cameras provide an option to record video clips and save these as .avi files. Unfortunately to play these you need to install the particular camera manufacturer's codec. This is no good for CDROM presentations you want to share with other people.
I have found .mpg files to be much more consistent. These are encoded using the MPEG1 coding scheme originally developed for use on Video CDs. (The present DVD format uses MPEG2, which offers higher quality pictures). The standard Windows Media Player, included with Windows is able to play MPEG1 encoded video without need of further plug-ins or codecs. So provided you can get your video into a suitable .mpg file, you are in business.
My preferred method is to copy the video onto DVD (I have a DVD recorder and am in the process of transferring my own analog recorded home video footage from Betamax and Video8 tape to DVD). Then on the PC, there are a number of programs which can be used to convert from DVD to MPEG1. I have successfully used the cumbersomely named, but modestly priced program "1 Click DVD to MPEG MPG" to do the job. A trial version may be downloaded from the author's http://www.dvdtompeg.biz/ web site.
| autorun.inf | Specifies what to run | ||||
browsercall.exe
|
    [autorun]

    ICON=icon.ico

    LABEL=My Wonderful CD

    OPEN=browsercall.exe start.htm
The file browsercall.exe is a utility to launch the user's web browser and display your start.htm page as defined above. It is written and copyrighted by AshzFall but is made available as freeware and may be downloaded from their web site at http://www.ashzfall.com/products/autorun/browsercall.html which also provides an explanation of why it is required.
| Copyright © Alan Simpson 2006 | Back to index. | Last Updated 2006-08-04 |