|
Transcribing Monumental Inscriptions "... jolly memorials for when you pass away." Gerard Hoffnung in 1958 'quoting' a Tyrolean landlord, during his Speech to the Oxford Union. |
Britain has a wealth of genealogical information, inscribed on graves in more than 20,000 churchyards. The phrase 'carved in stone' conveys an idea of permanence which sadly is far from the truth. The majority of grave monuments are unlikely to survive in a readable condition for more than two hundred years. The effects of weathering, vegetation and vandalism combine to destroy the surface of the stone. Many stones are removed wholesale in the name of tidy, easily-mown churchyards, or when a church has become 'redundant' and the churchyard sold for other purposes. There is a national program to transcribe as much information as possible before it is lost. At the local level, this is organised through Family History Societies. Since retiring, I have become involved in transcribing monumental inscriptions with the Oxfordshire FHS and latterly have taken on the role of MI co-ordinator for that society.
There is a special camaraderie, amongst those who spend their time lying in long, wet grass in a churchyard, staring intently at a tombstone, in the hope that the sun will come out and reveal a so-far undeciphered name. It is to such people that this page is addressed. It provides some tips for would-be recorders, illustrated by photographs of some headstones transcribed recently at Cuddesdon in Oxfordshire.
Links to other Web Sites
| Jill Muir, the previous MI co-ordinator, for Oxfordshire Family History Society, provides lots of useful information relating to MI recording, on her site at http://www.gravematters.org.uk/ whilst Rod Neep, another experienced MI recorder, covers many aspects of the art on his web site at http://www.british-genealogy.com/resources/graves/ . Rather than duplicating these people's work I have concentrated here on some specific aspects of technique, which may be of help to others. See also the other pages on this web site which relate specifically to the presentation of MI transcripts in the form of a CD ROM. |
Use of the Sun
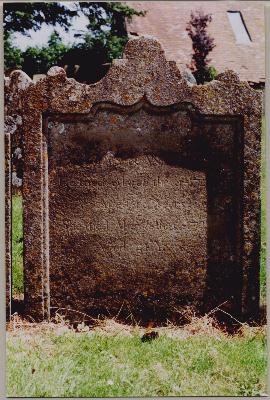
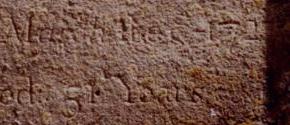
| With many old stones, the inscription has almost completely worn away over the years, and only the shallowest of indentations remains. Under most lighting conditions these are imperceptable. However if you are lucky enough to get direct sunlight grazing the surface of the stone, even the faint remaining indentations cast shadows which suddenly leap out at you and are easily read. The example shown here demonstrates the point. The portion of this early 18th century stone that is in sunlight, is readable (as shown by the magnified detail below), whilst nothing is visible on the portion that is in shadow. The obliqueness of the sun's rays may be judged from the length of the shadows cast on the shallow depressed surface created for the inscription. The angle of the sun is just right for only about 10 minutes a day, not allowing for the cloud which always appears at the worst possible moment! |
|
| |
| Which brings us to the next technique.... |
Use of a viewing tube
Many sources advise using a rolled-up cardboard tube, or similar, to view the stone,
"in order to concentrate the eye on a specific area". Like a number of colleagues, I had
tried the technique and decided "it didn't work for me". The reason is that the explanation
about "concentrating the eye", is missing the point. The tube works because, like the oblique
sunlight, it allows the only light falling on the stone to do so at a very shallow angle,
from one specific direction. The eye then views the stone roughly square-on through the tube
and so can see the shadows cast by the oblique light. For this to work well requires three things.
|
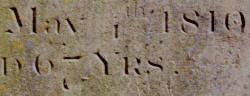
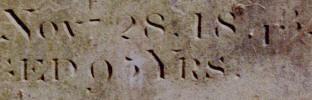
Reading Numbers
| To the modern transcriber, numbers from the 19th century and earlier can be quite a challenge. We are used to figures in a very standard form, all sitting in the same place on a line of text. On older inscriptions you will find numbers extending above and below the line of text. Morover only a few of the strokes in numbers were deeply carved. Many of the lines which show a resemblance to modern numbers were very faintly carved and have been lost on most stones over the years. The stone shown here was unusual in that although it dates back to the 1840's, the carving has remained crisp. It contains examples of all digits apart from zero and is useful to show which clues to look out for when identifying digits on other more worn stones. |

|
| |
|
The enlargements show sufficient detail to identify the shapes of the numbers. Look
first at the lower of the two. It is from the bottom two lines of the stone, which read
| Copyright © Alan Simpson 1999, 2000 | Back to index. | Last Updated 2006-01-29 |